Building Serverless Apps using AWS
The services which we are going to use in this article are:
AWS Lambda
Amazon API Gateway
AWS Amplify
Dynamo DB
AWS Cognito
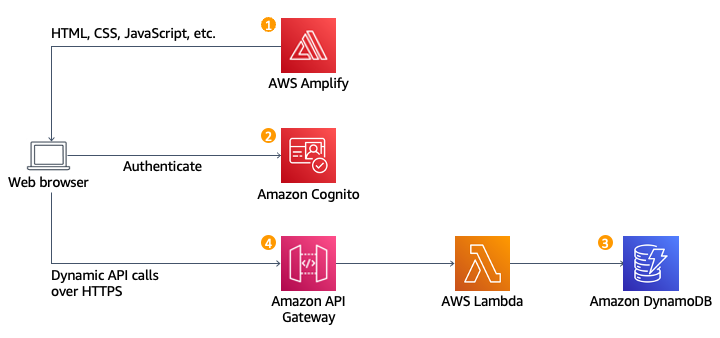
The working of the architecture is Amplify provides the continuous deployment and hosting of the static web resources which will be loaded in the user’s browser. The JavaScript which is executed in the browser sends and receives data from a public backend API built using API Gateway and Lambda functions. The Cognito Service provides user management and authentication functions to secure the backend API. Dynamo DB used to store the data sent by the API’s Lambda function.
A git-based workflow for continuous deployment and hosting of full-stack web apps is offered via the Amplify Console. In later Steps, you’ll use JavaScript to call distant RESTful APIs created using AWS Lambda and Amazon API Gateway and add dynamic functionality to these pages.
Region Selection:
We need to select a region which will support the following services:
AWS Cognito
AWS Amplify
AWS CodeCommit
Let suppose, I will be using us-east-2 (Ohio) for this article.
Environment Setup:
Open your windows PowerShell or the terminal with admin permissions, and install the aws-shell
pip install aws-shell
Once you are done, you need to configure the AWS.
aws configure
it will ask you for the AWS access keys, where you will be getting them from the security credentials in the account page.
There you need to create new Access keys and save them to the local file like notepad.
Enter these access key and secret access key in the terminal, and your are successful with your configuration.
Creating a repository in codecommit
aws codecommit create-repository –repository-name wild-rydes
This codecommit is a platform where you can create and manage your projects and repositories but included in AWS.
Now we have created a repository in the AWS named wild-rydes and we need to push some code into that repository. AWS provides some sample codes for us to use them.
https://github.com/aws-samples/aws-serverless-webapp-workshop.git
This is link where you can use the sample codes for building the server less webapps.
we are going to clone this repository and deploy the application.
git clone https://github.com/aws-samples/aws-serverless-webapp-workshop.git
This repository actually has many projects included, so we will just remove them unwanted projects and get the project which we wanted to use and then push that to the Code Commit repository.
git subtree split -P .\resources\code\WildRydesVue\ -b WildRydesVue
so we have created a new subtree which has the code we wanted to use, and i will create a new directory for the repository
mkdir ../wild-rydes
- in the newly created folder
git init
git pull ../aws-serverless-webapp-workshop WildRydesVue
git remote add origin codecommit://wild-rydes
git push -u origin master
By this step we will be having the code loaded into the Code commit.
Now we need to deploy this to AWS Amplify.
Setting up AWS Amplify:
Open the AWS Amplify and click on create Amplify Hosting. since you wanted to host the existing code you can select the AWS Code Commit option for the deployment.
Select the repository which you have created in the AWS Code Commit. The branch name would be master and the App name would be wild-rydes.
Create a newprod environment for the production chain and attach the execution role with the required policies. Once you are done setting up all the required things you can click on Save and Deploy.
Once this is done, you will be getting a link where you can visit the static website without having any backend functionality.
Setting the User-management Cognito:
First install the aws-amplify/cli. To do that open the terminal and enter
npm install -g @aws-amplify/cli
to start the amplify we need to initialize that…
amplify init
1
2
3
4
5
6
Enter the name for the environment: prod
Choose your defualt editor: Visual Studio code
Select the authentication menthod you want to use: AWS Access keys
accessKeyId:
secretAccessKey:
region: us-east-2
Now we need to add the authentication which means the users pool for the environment which we are using.
amplify add auth
1
2
3
4
5
Do you want to use the default authentication
and security configuration? Default Configuration
How do you want users to be able to sign in? username
Do you want to configure advanced settings? No, I am done.
On doing this step we will be getting some files in the local folder which are related to authentication.
so we need to add them and push to the repository.
git add .
git commit -m "added userpool"
git push
Go to the AWS Amplify Console and reload the page. It will rebuild the branch with the changes we have made.
If you redirect to the auth page of the website you will be getting a SignIn and SignUp page for you to login and create Account.
Setting up Dynamo DB:
we need to create a table with name Rides and the partition key to be Rideid . And we need to create a IAM role for the lambda function. with this IAM role i can give access from the lambda function to other AWS Services.
Create a IAM role with the following policies:
- AWSLambdaBasicExecutionRole
and also add a inline policy for the access to the dynamo DB. The permission we need to give for this policy is PutItem , and add the ARN of the Table.
Setting up Lambda Function:
Create a function with name RequestUnicorn and the Runtime to be Node.js 16.x and attach the execution role.
1
2
3
4
5
6
7
8
9
10
11
12
13
14
15
16
17
18
19
20
21
22
23
24
25
26
27
28
29
30
31
32
33
34
35
36
37
38
39
40
41
42
43
44
45
46
47
48
49
50
51
52
53
54
55
56
57
58
59
60
61
62
63
64
65
66
67
68
69
70
71
72
73
74
75
76
77
78
79
80
81
82
83
84
85
86
87
88
89
90
91
92
93
94
95
96
97
98
99
100
101
102
103
104
105
106
// Copyright Amazon.com, Inc. or its affiliates. All Rights Reserved.
// SPDX-License-Identifier: MIT-0

import { randomBytes } from 'crypto';
import { DynamoDBClient, PutItemCommand } from '@aws-sdk/client-dynamodb';
import { marshall } from '@aws-sdk/util-dynamodb';

const ddbClient = new DynamoDBClient({ region: 'us-east-1' }); // Update with your desired region

const fleet = [
  {
    Name: 'Bucephalus',
    Color: 'Golden',
    Gender: 'Male',
  },
  {
    Name: 'Shadowfax',
    Color: 'White',
    Gender: 'Male',
  },
  {
    Name: 'Rocinante',
    Color: 'Yellow',
    Gender: 'Female',
  },
];

export async function handler (event) {
  if (!event.requestContext.authorizer) {
    return errorResponse('Authorization not configured', event.requestContext.requestId);
  }

  const rideId = toUrlString(randomBytes(16));
  console.log('Received event (', rideId, '): ', event);

  const username = event.requestContext.authorizer.claims['cognito:username'];

  const requestBody = JSON.parse(event.body);

  const pickupLocation = requestBody.PickupLocation;

  const unicorn = findUnicorn(pickupLocation);

  try {
    await recordRide(rideId, username, unicorn);

    return {
      statusCode: 201,
      body: JSON.stringify({
        RideId: rideId,
        Unicorn: unicorn,
        UnicornName: unicorn.Name,
        Eta: '30 seconds',
        Rider: username,
      }),
      headers: {
        'Access-Control-Allow-Origin': '*',
      },
    };
  } catch (err) {
    console.error(err);

    return errorResponse(err.message, event.requestContext.requestId);
  }
};

function findUnicorn(pickupLocation) {
  console.log('Finding unicorn for ', pickupLocation.Latitude, ', ', pickupLocation.Longitude);
  return fleet[Math.floor(Math.random() * fleet.length)];
}

async function recordRide(rideId, username, unicorn) {
  const params = {
    TableName: 'Rides',
    Item: marshall({
      RideId: rideId,
      User: username,
      Unicorn: unicorn,
      UnicornName: unicorn.Name,
      RequestTime: new Date().toISOString(),
    }),
  };

  await ddbClient.send(new PutItemCommand(params));
}

function toUrlString(buffer) {
  return buffer
    .toString('base64')
    .replace(/\+/g, '-')
    .replace(/\//g, '_')
    .replace(/=/g, '');
}

function errorResponse(errorMessage, awsRequestId) {
  return {
    statusCode: 500,
    body: JSON.stringify({
      Error: errorMessage,
      Reference: awsRequestId,
    }),
    headers: {
      'Access-Control-Allow-Origin': '*',
    },
  };
}
Deploy the above code and test the event with the following text
1
2
3
4
5
6
7
8
9
10
11
12
13
14
15
16
17
18
19
20
{
    "path": "/ride",
    "httpMethod": "POST",
    "headers": {
        "Accept": "*/*",
        "Authorization": "eyJraWQiOiJLTzRVMWZs",
        "content-type": "application/json; charset=UTF-8"
    },
    "queryStringParameters": null,
    "pathParameters": null,
    "requestContext": {
        "authorizer": {
            "claims": {
                "cognito:username": "the_username"
            }
        }
    },
    "body": "{\"PickupLocation\":{\"Latitude\":47.6174755835663,\"Longitude\":-122.28837066650185}}"
}
you will be getting a response statuscode of 201.
Setting the API Gateway:
Create a REST API with API management capabilities and we need to configure with the authorizers with the Cognito users
Click on Authorizers and give it a name, and choose the Cognito. And the token Source to be Authorization and create the authorizer
Now we need to add the Resources… Create a resources with name ride and path will be /ride and enable the API Gateway CORS
in that create a POST method and attach the lambda function RequestUnicorn.
Edit the method request and change the Authorization settings from None to wildrydes which we created in the Cognito User pool.
Now Deploy the API and the stage name to be Prod.
Make the copy of url and include that in the website code.
1
2
3
4
5
6
// src/config.js
module.exports = {
    api: {
        invokeUrl: 'your_url'
    }
}
save the edits and commit the changes…
git add .
git commit -m "API Appended"
git push
Useful links:
https://github.com/aws-samples/aws-serverless-webapp-workshop/tree/main/resources/code/WildRydesVue
https://webapp.serverlessworkshops.io/3-serverlessbackend/4-lambda/requestUnicorn.js